Create accounts for your users
Before reading this tutorial...
You should be familiar with the following concepts:
WePay lets you create accounts for your users through the API, so they can start accepting payments on your platform, instantly.
Creating an account for a user happens in two steps:
- OAuth2: Get the user's authorization to create and manage their WePay account
- Get an access token for the user
- Create a WePay account for the user using the /account/create call.
OAuth2
The purpose of OAuth2 is to get an access_token for a user, so you can create and manage their account.
First, send the user to the authorization endpoint uri with the following parameters uri encoded:
| Parameter | Description |
| client_id | Your app's unique identifier. Find it on your dashboard |
| redirect_uri | Where the user will be redirected after they complete the authorization. |
| scope | Custom user permission settings are no longer supported. Please provide a comma-separated list of all of the following permissions when registering a user with this call: manage_accounts, collect_payments, view_user, preapprove_payments, and send_money. |
https://stage.wepay.com/v2/oauth2/authorize?
    client_id=[your client id]
    &redirect_uri=[your redirect uri]]
    &scope=[manage_accounts,collect_payments,view_user,preapprove_payments,send_money]
The user will see the following screen:
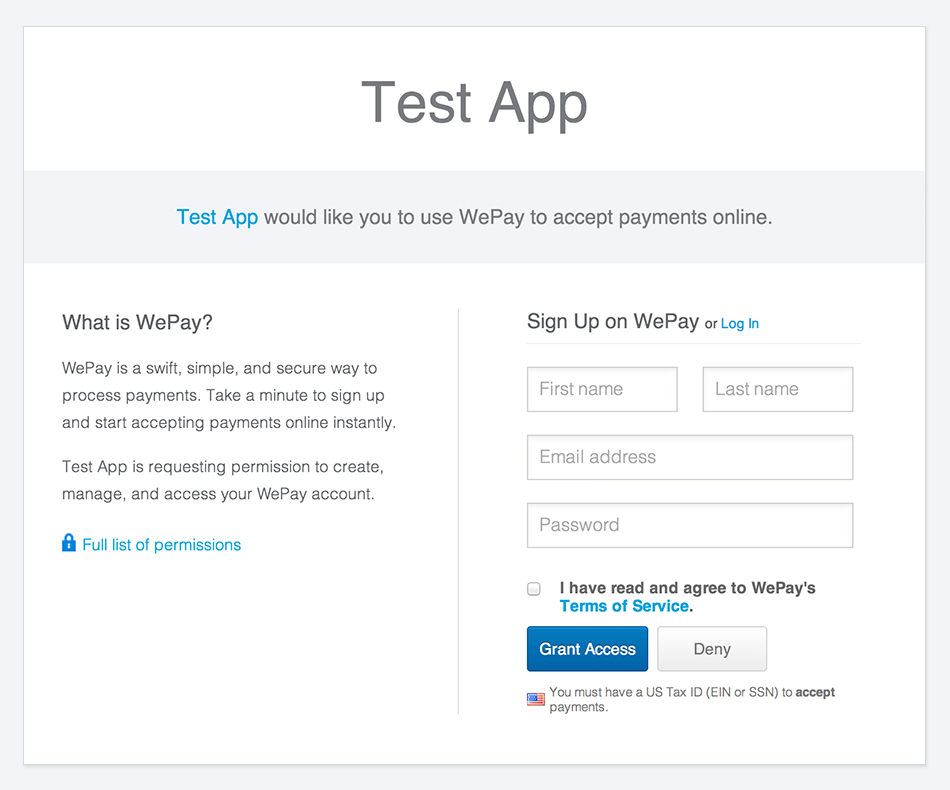
Want to customize this page?
Create a theme and upload a logo to ensure a great user experience.
Learn more about customizationResponse:
Once the user grants you authorization, they'll be returned to the redirect_uri you've provided along with a url-encoded code parameter.
http://example.com/setup?code=1a2b3c4d5e6f
Get an access token
Set up your redirect_uri to listen for this code parameter, which you can exchange for an access_token using the /oauth2/token call. The response to the call will be sent to the redirect_uri provided in the call as a POST request.
API Call:
| Parameter | Description |
| client_id | Your app's unique identifier. Found on your dashboard |
| client_secret | Your app's secret password. Found on your dashboard |
| redirect_uri | The redirect uri you used in the authorization endpoint uri (previous step) |
| code | The code you received in the previous step |
https://stage.wepayapi.com/v2/oauth2/token?
    client_id=[your client id]
    &redirect_uri=[your redirect uri]
    &client_secret=[your client secret]
    &code=[code you got in the previous step]
Response:
| Parameter | Description |
| user_id | The unique ID of the user that has granted you authorization |
| access_token | The token that allows you to make calls on behalf of that user |
| token_type | For now, this will always be BEARER |
| expires_in | When the token will expire. If not present, the token will not expire automatically. |
{
    "user_id":123456,
    "access_token":"1a2b3c4d5e6f",
    "token_type":"BEARER"
}
Now that you have an access_token for the user, you have everything you need to create a WePay account for them.
Create a WePay account
To create a WePay account for one of your users, use the /account/create call with that user's access_token.
API Call:
| Parameter | Description |
| name | What you would like to name the account. (Note: This appears on people's credit card statements, so we suggest using the name of the person or business accepting payments) |
| description | The description or purpose of the account you're creating. |
- PHP
- cURL
- Ruby
- Python
<?php
    // WePay PHP SDK - http://git.io/mY7iQQ
    require 'wepay.php';

    // application settings
    $client_id = 123456789;
    $client_secret = "1a3b5c7d9";
    $access_token = "1a3b5c7d9";

    // change to useProduction for live environments
    Wepay::useStaging($client_id, $client_secret);

    $wepay = new WePay($access_token);

    // create an account for a user
    $response = $wepay->request('account/create/', array(
        'name'          => 'Account Name',
        'description'   => 'A description for your account.'
    ));

    // display the response
    print_r($response);
?>
curl https://stage.wepayapi.com/v2/account/create \
	-H "Authorization: Bearer STAGE_8a19aff55b85a436dad5cd1386db1999437facb5914b494f4da5f206a56a5d20" \
	-d "name=Account name" \
	-d "description=A description for your account."
# WePay Ruby SDK - http://git.io/a_c2uQ
require 'wepay'

# application settings
client_id = 123456789
client_secret = '1a3b5c7d9'
access_token = '1a3b5c7d9'

# set _use_stage to false for live environments
wepay = WePay::Client.new(client_id, client_secret, _use_stage = true)

# create an account for a user
response = wepay.call('/account/create', access_token, {
    :name          => 'Account Name',
    :description   => 'A description for your account.'
})

# display the response
p response
# WePay Python SDK - http://git.io/v7Y1jA
from wepay import WePay

# application settings
access_token = '1a3b5c7d9'
production = False

# set production to True for live environments
wepay = WePay(production, access_token)

# create an account for a user
response = wepay.call('/account/create', {
    'name': 'Account Name',
    'description': 'A description for your account.'
})

# display the response
print response
Response:
| Parameter | Description |
| account_id | The user's account, which will hold the payments they receive |
| account_uri | A uri that corresponds to the account's page on WePay. |
{
    "account_id":12345,
    "account_uri":"http:\/\/stage.wepay.com\/group\/view\/12345"
}
Now that you've learned how to create accounts for your users, they can start accepting payments on your platform.